Quick Start
Software Installation
The system can be used out of the box. All software modules are installed on the microarrayer computer and the system is calibrated.Optional Software Installation
Software for Remote Access
We recommend connecting the microarrayer to the network via WiFi or Ethernet to be able to access it from an external computer. This allow backing up files with print programs and settings created during operating the system. For access file system of the arrayer computer you need to install a program on the remote computer. Refer to Accessing and Operating Microarrayer via Network manual for details.Installing Microarrayer Software on Remote PC
Creating print programs with the Program Editor is more convenient on a larger monitor. For this purpose the Program Editor can be installed on a remote computer. Robot Control module can also installed and run on an external PC. It wont be connected to the microarrayer, but it can execute programs in the Simulation Mode. With the remote access programs can be created and validated on an external PC and transferred to the microarrayer via the network. Refer to Software Installation manual for details.Electric Connections
Connect Monitor
THe arrayer is shipped with 14" monitor. But any monitor with HDMI input can be used with the arrayer. Monitor is connected to HDMI port of the Arrayer computer.Connect Power Supplies
The arrayer computer is powered with 5VDC power supply with Micro USB connector. Connect it to the micro USB port on the computer. Once the 5V DC power supply is connected the computer can be powered-up and used. The arrayer motors use separate power supply 24VDC. Connect it to the coaxial port on the arrayers computer. After that connect the 24VDC power supply to the power outlet ( 120VAC or 240VAC ). The 24VDC power is needed only when running the system.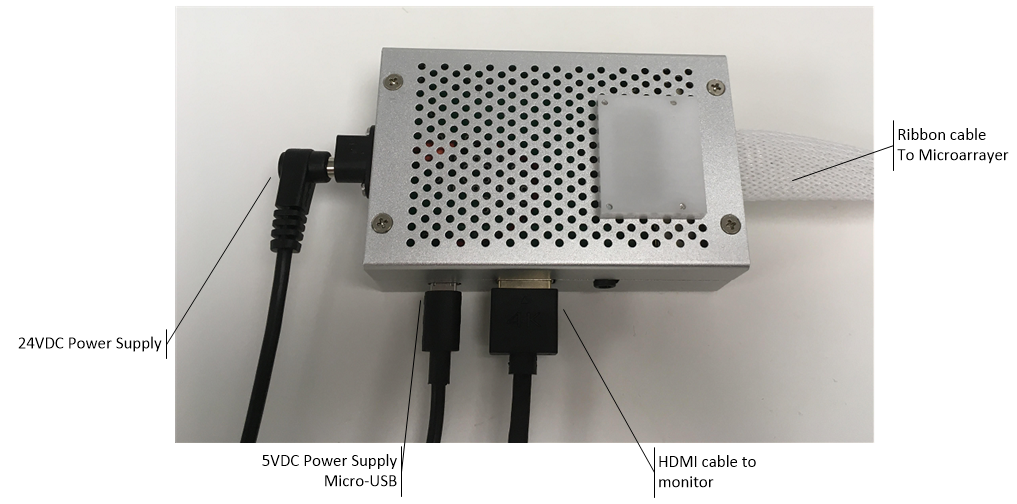
Connect Keyboard and Mouse
The arrayer is shipped with Bluetooth keyboard and mouse. Push power buttons of the keyboard and mouse. When the arrayer computer is powered up the keyboard and mouse will be connected. ( they are paired with the computer at the factory ). It is also possible to use the arrayer with USB keyboard and mouse. Connect them to any of the four USB ports available on the arrayers computer. No configuration is necessary.Power-up the Arrayer
- Switch on monitor, keyboard, mouse - Power-up arrayer computer - Wait until it loads operating system. - Power-up ( connect to power outlet) 24VDC Power supply. Click on the "R" shortcut on the desktop. This will run the "Robot Control" software module.Click on the [ I/O ] button in the upper left corner of the "Robot Control" window. The arrayer will power up and find the "Home" position. ( It may take a few seconds, depending on the initial position of the motion system ). When the initialization is complete, the Green dot will lit-up on the [I/O] button.
The system is ready to use. Try a few moves using manual controls. Refer to Robot Control Module manual for details. Click "H" button to return the system to the "Home" position. Load and run one of the test programs the system shipped with.
Connect Vacuum and Water Tubes